YouTube video makers compete for viewers’ attention in the vast digital world. Learning How to Schedule a YouTube Video can make the difference between uploading videos and taking over the platform.
Imagine that you’ve put everything you’ve got into making the perfect video—a work of art that will capture your viewers. What should I do now?
How do you make sure it works as well as it can and grabs people’s attention at the right time? That’s where the schedule comes in handy.
Think about this: You’re a passionate content maker who can’t wait for the right time to share your latest work with the world.
As the launch date gets near, people get more and more excited. Finally, with the click of a button, your masterpiece is ready to go live and reach people all over the world.
But timing isn’t as simple as it seems. We’ll learn everything about scheduling videos on YouTube, from how to use the Studio tools to how to get your audience involved.
Friends who make videos, buckle up, because we are about to start the best guide to taking over YouTube with the power of timing.
Getting Started with YouTube Video Scheduling
Setting up your channel for success is the first thing you should do before you start learning how to schedule YouTube videos.
You first need to make a YouTube page if you don’t already have one. Not hard at all.
Just log in to your Google account, go to YouTube, and click on your profile picture in the upper right spot. Pick “Your Channel” and then do what it says to set up the name, description, and personal picture for your channel.
Once you have a channel, it’s time to get into YouTube Studio, which is where all of your videos are managed. This powerful set of tools is where you’ll control everything about your channel, from adding videos to looking at how well it’s doing.
If you want to get to YouTube Studio, click on your personal picture again and choose “YouTube Studio.” You’ll find a lot of tools here that are meant to make making video easier and improve the performance of your channel.
As you get better at using YouTube Studio, you’ll naturally find your way to the Video Manager, which is where you can organize, edit, and schedule your videos.
If you click on the “Content” tab in YouTube Studio, you’ll be taken to the Video Manager, where you can see all of your posted videos.
With just a few clicks, you can easily plan when your content will be released, tweak the settings for videos, and see how they’re doing.
Now that you have the basics down and the right tools, you’re almost ready to master arranging YouTube videos and get the most out of your channel.
Exploring YouTube Studio Features
Before you start arranging YouTube videos more precisely, you should familiarize yourself with YouTube Studio’s many features.
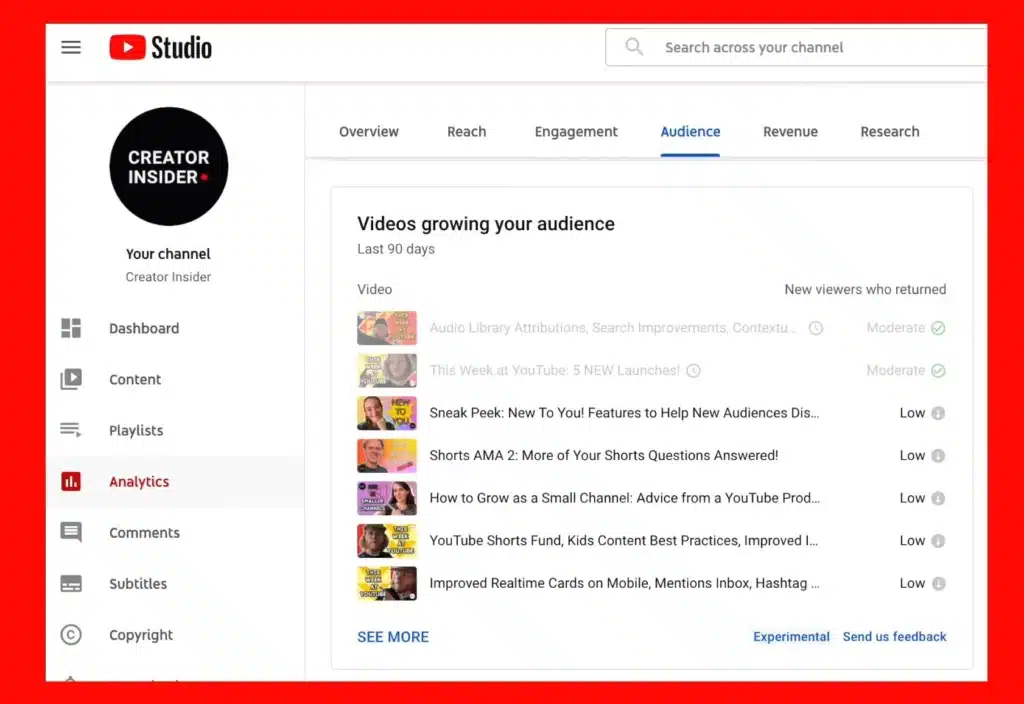
The powerful YouTube Studio Dashboard is at the heart of this platform. It’s where you can control everything about your channel’s content. This page gives you a full picture of how well your channel is doing, showing important numbers like views, watch time, and member growth.
This big-picture view of your channel’s health tells you a lot about your audience’s likes and dislikes and how they act, which helps you decide what to post and when to post it.
Mastering YouTube Studio means knowing how important video settings and details are, not just the UI.
Your video’s title, description, tags, and sections are just a few of the many important parts that affect how easy it is to find and how appealing it is to viewers.
Writing an interesting title and description for your video not only helps people understand what it’s about, but it also makes it easier to find on the site.
Similarly, choosing tags and categories wisely can help people find your movie and get it watched by more people.
But thumbnail selection is one of the most useful but little known tools in YouTube Studio. The thumbnail for your movie is its first impression, and it should make people want to click and watch.
You can choose from a number of automatically generated thumbnails in YouTube Studio, or you can post your own image. Use this chance to make thumbnails that are interesting to look at, correctly show what the video is about, and get people interested.
Lastly, when you’re scheduling your videos, it’s important to know the different ways they can be seen. Setting a video to be unlisted for private viewing, making it public, or keeping it private to edit later is easy to do in YouTube Studio. You can change how visible your video is to fit your needs.
By learning how to use and discovering YouTube Studio’s features, you’ll get the tools and knowledge you need to get better at scheduling videos and take over YouTube like never before.
How to Activate YouTube Video Scheduling Features
It’s important to turn on this feature on your YouTube page if you want to get the most out of scheduling videos.
The steps are easy, but you need to make sure your account is approved first.
First step: Make sure that your account has been added. When you get verified, your channel is safer and you can use more advanced features like arranging videos.
Go to your YouTube Studio Dashboard and click on “Settings” on the menu on the left.
In that menu, choose “Channel” and then “Status and Features” to see if you have been verified.
Don’t worry if your account isn’t already verified; step two is to get it confirmed. Most of the time, this means getting an identification code by text message or phone call to prove who you are.
Step three is to enter the code in YouTube Studio after you get it. Just put the verification code where it says to in the designated field, and your account is now verified. You can now use the features for scheduling videos.
After doing these easy steps, you’ll be ready to use YouTube’s powerful scheduling tools to get the most out of your content plan and take over the platform like a pro.
Benefits of Scheduling YouTube Videos
There are many perks to learning how to schedule videos on YouTube that can help your channel stand out from the rest.
Scheduling your videos saves you time because you can plan and prepare content ahead of time. This way, you can make sure that you always have videos to share without having to worry about missing deadlines.
Also, being consistent is important for building a loyal audience. Scheduling lets you offer content consistently at the best times, which keeps people interested and coming back for more.
Scheduling not only saves time and ensures consistency, but it also gets your audience more involved by posting videos at times when they are most likely to be watching them.
By looking at how your viewers act and planning your releases accordingly, you can make sure your content gets the right people at the best time for them to watch and interact with it.
Scheduling videos can also help your YouTube search ranking by showing the algorithm that your channel is active and regularly making good content. This can help you get more new fans and be seen by more people, which can lead to growth and an even bigger audience.
Additionally, using timing to your advantage gives you an edge in the crowded world of YouTube. By delivering your content in a planned, organized, and consistent way, you establish yourself as a trustworthy and knowledgeable creator, paving the way for long-term success and control on the platform.
Scheduling YouTube videos has benefits that go far beyond just being convenient. They’re the keys to growth, engagement, and eventually dominance on YouTube.
How to Schedule a YouTube Video Using the YouTube App
Here’s how to use the YouTube app to schedule videos, step by step:
Step 1: Put your video online.
Start the uploading process by opening the YouTube app on your phone and hitting on the camera icon. Go to the video on your device and choose the one you want to share. Then, follow the on-screen instructions to add information like the title, description, tags, and thumbnail.
Step 2: Type in About Your Video
After you upload your video, make sure you fill out all the necessary information to make it more visible and appealing to your audience. Make a catchy title, a detailed and interesting description, relevant tags, and an interesting image to get people to look at your listing.
Step 3: Set up a YouTube video
Once you’re done entering information about the video, click “Next” to move on to the scheduling choices. This is where you can choose a later date and time to watch your video. Choose the date and time you want your video to go live, making sure it fits with your content plan and the times that your audience likes.
Step 4: Planned a YouTube video
Once you’ve picked the scheduling choice, go back to your settings and make sure your video is set to play at the right time. Now, your video will be set to go live at the given date and time. This lets you plan ahead for when your content will be released and keep things consistent.
Step 5: Use YouTube Premiere to plot a video.
YouTube Premiere is a great tool for artists who want to get people excited about their videos and interact with them before they come out. Premiere lets you set a video to play at a certain time and includes a countdown timer and live chat so watchers can talk to each other in real time.
By following these steps, you’ll be able to schedule your videos on the YouTube app, which will let you easily control your channel and interact with your audience, whether you’re at home or on the go.
how to schedule a YouTube video on desktop
Any serious content maker needs to know how to schedule YouTube videos on a desktop computer. Here is a complete guide on how to use your PC to schedule your YouTube videos:
First, go to YouTube and sign in.
First, use your favorite web browser to log in to your YouTube account. After logging in, go to the home page of YouTube.
Step 2: Open YouTube Studio
Press on your profile picture in the upper right part of YouTube’s home page, then pick “YouTube Studio” from the menu that appears. This will take you to the main screen of YouTube Studio.
Step 3: Click “Make”
Find the “Create” button in the menu on the left side of YouTube Studio and click on it. This will bring up a drop-down menu with different ways to create material.
Step 4: Put your video online.
Choose “Upload video” from the drop-down menu to start the process. From your computer, pick out the video file you want to add to your channel. Then, follow the on-screen instructions to add it.
Step 5: Put information about your video here
After you upload your video, you will be asked to add information like the title, description, and tags. Take the time to make these changes so that people can find your movie more easily.
Step 6: Put comments on the pictures
Here is where you can add captions or subtitles to your video. Click on the “Subtitles” tab and then “Add” to share your caption file.
Step 7: Add a final card
Adding an end card to your movie will keep people watching longer. Click on the “End screen” tab and choose “Add element” to add interactive elements like buttons to subscribe or movies that you might like.
Step 8: Put in more cards
Adding cards to your movie will keep people interested even more. Choose “Add card” from the “Cards” tab to add dynamic cards that lead to other videos, playlists, or websites.
Step 9: Fix any problems
Before you schedule your video, check to see if YouTube has reported any problems. Read through any alerts or notifications about copyright claims, material restrictions, or other problems that may need to be fixed.
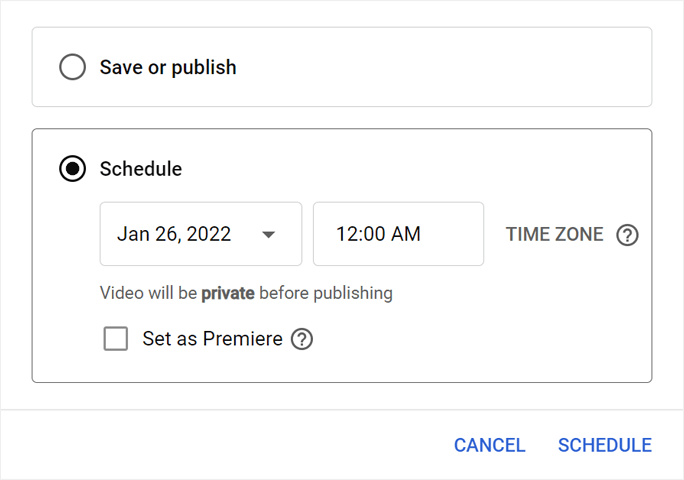
Step 10: Plan when to post your YouTube video
After you have added all the necessary details and fixed any problems, click on the “Schedule” button to pick a date and time for your video to go live. Pick the date and time you want, then click “Schedule” to make sure.
How to schedule a YouTube video on mobile
Mastering YouTube video scheduling works on mobile devices too, so artists can control their content while they’re out and about. Here are the steps you need to take to schedule a YouTube movie on your phone:
First, open the YouTube app.
Start by opening the YouTube app on your phone or tablet. Make sure you’re logged into your YouTube account so you can use all the tools.
Step 2: Pick whether to post a movie or a short
Click on the camera button at the top of the app’s screen. Choose “Post a video” from the list of choices to start the uploading process.
Step 3: Pick out your video file
Find the video file on your computer that you want to upload and click on it. The app will start adding the movie to your YouTube channel as soon as you pick one.
Step 4: Add information about your video
Enter all the important information about your video, such as a catchy title, an in-depth and interesting description, the right tags, and any other necessary metadata.
Step 5: Add your own picture
You can change how your video looks by putting your own thumbnail. There are thumbnails that are already made, or you can add your own to make your video stand out.
Step 6: Set up a time for your video
Once you’ve filled out all the required fields, click the “Next” or “Next” button to move on to the scheduling choices. This is where you can choose a later date and time to watch your movie. Pick the date and time you want your video to go online.
Step 7: Put your movie online.
After you’ve scheduled your movie, go back and check all of the settings to make sure they are correct. Now, your video will be set to go live at the given date and time. This lets you plan ahead for when your content will be released and keep things consistent.
If you follow these steps, it will be easy to schedule your YouTube videos from your phone. This will let you control your channel and interact with your viewers from anywhere.
Optimizing Scheduling for Audience Engagement
Creators who want to rule YouTube must make sure that their schedules are set up in a way that keeps their audiences interested.
To do this, it’s important to know how the crowd acts. By looking into your audience’s demographics, viewing habits, and engagement metrics, you can learn a lot about when they are most active and open to new material.
By using analytics to help you plan your schedule, you can find the best times to share videos so that you can reach and interact with your audience the most.
To reach people all over the world, you also need to make sure that your material is suitable for different time zones. With watchers from all over the world and in different time zones, making sure that your videos air at the best times for them means that they reach people all over the world when they’re most likely to watch them.
You can find the best times to post your videos by using tools like the tracking tools in YouTube Studio. This will help you plan when to release your content.
By knowing how your audience acts, using data to help you plan your schedule, and making sure your content is suitable for different time zones, you can improve your planning to get your audience more involved and eventually take over YouTube with videos that people all over the world love.

Tips and Tricks for Effective Video Scheduling
Setting a date and time for your YouTube videos isn’t enough; you need to plan ahead to get the most out of your content and reach as many people as possible.
Here are some useful tips and tricks for scheduling videos well:
It’s important to stick to a regular upload plan if you want to build trust and loyalty among your audience. Sticking to a regular plan, like uploading once a week, twice a week, or once a month, lets your viewers know when to expect new content from your channel, which keeps them interested and coming back for more.
Trying Out Different Scheduling Times: Being consistent is important, but you also need to try out different scheduling times to see what works best for your audience.
Try posting on different days of the week and at different times of the day to find out when your users are most likely to be online and interested in what you have to say.
Looking at how well your scheduled videos did, you can figure out what times get the most views and then change your approach to match.
Promoting Planned Videos on Multiple Platforms: To promote your planned videos, don’t just depend on YouTube’s algorithms. You can get people excited about your planned releases by using other social media sites and online communities.
To get people interested in your channel and get them to watch your videos, share teasers, behind-the-scenes images, or sneak peeks.
By using these tips and tricks for arranging videos well, you can make your channel more visible, get more people to interact with it, and eventually dominate YouTube.
Leveraging Top YouTube Scheduling Tools for Enhanced Scheduling
Using the best YouTube scheduling tools can completely change how you manage and plan your videos, giving you more options and features than YouTube Studio alone.
These third-party scheduling tools have a variety of features that are meant to make your work easier and your scheduling approach more effective.
There are many schedule tools out there, so it’s important to compare them to find the best one for your needs. Each tool has its own benefits that can help you get better at ordering your content, ranging from advanced automation features to full analytics and reporting tools.
By syncing your planned uploads with your channel’s content management system, scheduling tools that work with YouTube Studio make your work easier.
This integration makes things easier and gives you more control by letting you handle all of your content creation and organizing from one place.
You can take your scheduling to the next level by using third-party scheduling tools and integrating them with YouTube Studio. This will help you make the most of your content plan and take over YouTube like never before.
Ensuring Video Optimization for Scheduling Success
Making sure your videos are optimized is important for scheduling success on YouTube.
To get the most out of your content on all platforms, you need a plan. To begin, improving video content for multiple platforms means making sure that your videos fit the specific needs and tastes of the people who use each platform.
This could mean changing the size, aspect ratio, and format of videos and other material to make sure they work on platforms like Instagram, TikTok, and YouTube.
Another important part of video optimization is using SEO (Search Engine Optimization) techniques to make your content more visible and easy to find on YouTube.
To do this, you need to do keyword study to find high-volume search terms that are relevant to your video content. You can improve your videos’ chances of showing up in search results and getting free traffic by using these keywords carefully in their titles, descriptions, tags, and captions.
Also, keeping an eye on how the videos are doing and making changes as needed is important for making scheduling work best over time.
By regularly examining key measures like views, watch time, engagement, and audience retention, you can determine what’s working well and what needs work.
To get the most out of your video scheduling efforts, use these insights to improve your content strategy, try out different scheduled times, and improve your SEO strategies.
You can make sure your videos are ready for scheduling success on YouTube by focusing on optimizing them for different platforms, using SEO strategies to make them more visible, and regularly checking video performance to make changes.
This will set you up for dominance in the competitive world of online video content.
Advanced Strategies for Scheduling Success
It takes more than just basic skills to master YouTube video scheduling. To really rule the platform, you need to use advanced strategies.
One way to do this is to work with other YouTubers to promote each other. When you work with other creators in the same or a similar field, you can reach more people without even trying.
Cross-promotion lets you advertise your videos to new users who are likely to be interested in them by using the fans of your collaborators.
The success of your scheduling can also be greatly improved by using paid marketing and advertising. You can reach more people and make your scheduled videos more visible by spending money on targeted advertising efforts on YouTube and other digital platforms.
Paid promotion, like pre-roll ads, sponsored placements, or partnerships with influencers, can help your content reach more people and bring more people to your channel, which will eventually increase engagement and growth.
You can also get ahead with your scheduling by taking advantage of popular themes and seasonal interests by looking into trends and seasonal content.
Watch out for popular topics, hashtags, and holiday events that are related to your area, and plan your content around them. You can improve your chances of showing up in search results and make the most of people’s increased interest in certain topics or events by planning your videos around popular topics and holiday themes.
For example, you can take your video scheduling to the next level and become the most popular person on YouTube by working with other YouTubers to do cross-promotion, using paid promotion and ads, and looking into trends and seasonal content.

How to delete a scheduled video on YouTube
You can easily delete a set YouTube video if you change your mind about putting it out there after you’ve already planned it.
Here is a step-by-step guide:
First, go to YouTube Studio and sign in.
Sign in to your YouTube account and go to YouTube Studio, which is where you can control the content on your channel.
Second, move your mouse over the video you want to get rid of.
Find the planned video you want to remove from your lineup in YouTube Studio. When you move your mouse over the thumbnail of the video, a list of choices will appear.
Pick “delete forever” in the third step.
When the options menu comes up, choose “delete forever.” When asked to confirm your choice, click “Yes,” and the planned video will be taken off your channel’s schedule for good.
By following these easy steps, you can easily delete a planned YouTube video. This way, you can make sure that your channel only has videos that you want to share with your audience.
Conclusion
Finally, YouTube creators who want to take over the site and grow their channels effectively need to learn how to schedule videos.
Creators can make managing their content easier and keep a steady presence for their audience by using the features of YouTube Studio and scheduling tools that can be used on both desktop and mobile devices.
There are a lot of techniques to look into, from finding the best times to show things to keep people interested to using more advanced methods like cross-promotion and trend research.
The main point, though, is still the same: constancy is very important.
By setting a regular upload time and sticking to it, producers can gain the trust of their audience, make their channel easier to find, and eventually see long-term growth.
So, whether you’re new to scheduling YouTube videos or want to improve the way you do it, remember how important regularity and dedication are to scheduling success.
Have fun planning your schedule, and may your channel continue to do well and rule YouTube.
I hope I have fulfilled your search intent with this blog post. Please comment below if you have any questions regarding this post.
At the same time, please subscribe to our email newsletter to keep receiving these kinds of informative content directly in your inbox.
Frequently Asked Questions
How far in advance can I schedule a YouTube video?
You can schedule a YouTube video up to 60 days in advance.
Can I reschedule a video once it's been scheduled?
Yes, you can reschedule a video once it's been scheduled by editing the video's settings in YouTube Studio.
What time should I schedule a YouTube video?
The best time to schedule a YouTube video depends on your audience's peak activity times, typically during weekdays in the late morning or early afternoon.
What happens if I miss the scheduled publishing time for a video?
If you miss the scheduled publishing time for a video, it will not be automatically published and will remain in the scheduled state until manually published.
Is it possible to schedule videos on mobile devices?
Yes, it is possible to schedule videos on mobile devices using the YouTube app.
How many YouTube videos can I schedule?
You can schedule as many YouTube videos as you like, but be mindful of your channel's upload limits and audience engagement.
How does scheduling a video differ from publishing it immediately?
Scheduling a video sets it to be published at a specific date and time, while publishing it immediately makes it available to viewers right away.
How do I schedule a bulk video on YouTube?
To schedule a bulk video on YouTube, use the "Schedule" option when uploading multiple videos simultaneously in YouTube Studio.
How do I bulk upload and schedule YouTube shorts?
You can bulk upload and schedule YouTube shorts by uploading them as regular videos and setting the schedule accordingly.
Why can't I schedule my YouTube videos?
If you can't To schedule a bulk video on YouTube, use the "Schedule" option when uploading multiple videos simultaneously in YouTube Studio.
Schedule your YouTube videos, ensure that your account is verified and that you're using a supported browser or device.
How do I publish a video to YouTube in bulk?
To publish a video to YouTube in bulk, upload multiple videos at once in YouTube Studio and set their publishing dates and times accordingly.
Can you backdate YouTube videos?
No, you cannot backdate YouTube videos; they can only be scheduled for future publishing.
Can you bulk-schedule videos on YouTube?
Yes, you can bulk schedule videos on YouTube by uploading multiple videos at once and setting their publishing dates and times.

Md Afraz Alam is a digital marketing consultant, content strategist, and the founder behind Techfee and USA Tech Deals. Through Techfee, he shares practical insights on SEO, blogging, affiliate marketing, content marketing, freelancing, WordPress, and digital growth strategies designed to help bloggers, creators, freelancers, and small businesses build a stronger online presence, grow traffic, and scale their digital success through smart and ethical marketing practices.